mirror of https://github.com/nocodb/nocodb
You can not select more than 25 topics
Topics must start with a letter or number, can include dashes ('-') and can be up to 35 characters long.
205 lines
8.9 KiB
205 lines
8.9 KiB
|
1 year ago
|
---
|
||
|
|
title: "Table Operations"
|
||
|
|
description: "Table Operations: Row, Column, Quick Import, Export & Import"
|
||
|
|
---
|
||
|
|
|
||
|
|
Once you have created a new NocoDB project you can open it, In the browser, the URL would be like `example.com/#/default/<project_id>`.
|
||
|
|
|
||
|
|
## Table
|
||
|
|
|
||
|
|
### Table Create
|
||
|
|
|
||
|
|
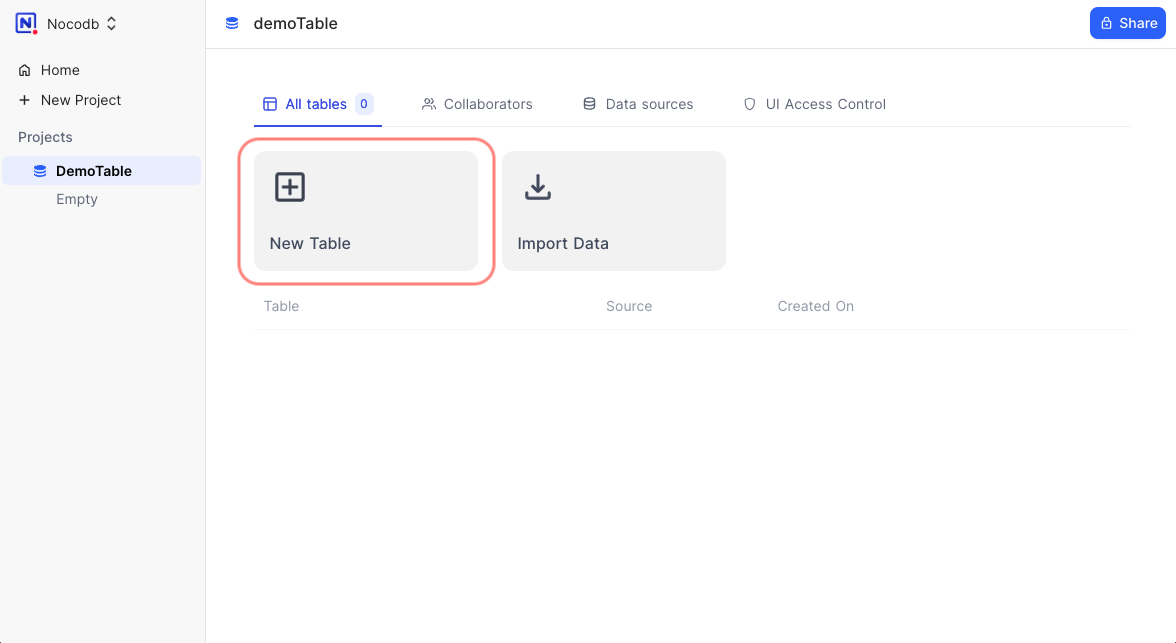
On project dashboard, click on `Add new table` button
|
||
|
|
|
||
|
|

|
||
|
|
|
||
|
|
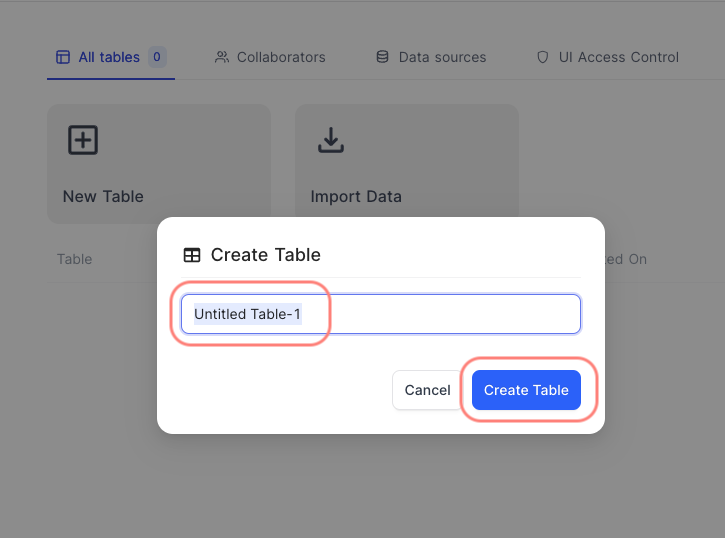
Provide a name for the table & click `Create Table` button.
|
||
|
|
|
||
|
|

|
||
|
|
|
||
|
|
After the successful submission, the table will be created and open on a new grid.
|
||
|
|
|
||
|
|

|
||
|
|
|
||
|
|
New table can also be created by using `+` button on project tile in left sidebar
|
||
|
|
|
||
|
|

|
||
|
|
|
||
|
|
|
||
|
|
### Table Rename
|
||
|
|
|
||
|
|
Right click on Table name on left sidebar, (OR)
|
||
|
|
Click on `...` to open `Table context menu`, select `Rename`.
|
||
|
|
Feed in the changes to the table name & press `Enter`
|
||
|
|
|
||
|
|

|
||
|
|
|
||
|
|
### Table Duplicate
|
||
|
|
|
||
|
|
Right click on Table name on left sidebar, (OR)
|
||
|
|
Click on `...` to open `Table context menu`, select `Duplicate`
|
||
|
|
|
||
|
|

|
||
|
|
|
||
|
|
Additionally, you can configure to duplicate
|
||
|
|
- `Include Data` : toggle this to include/exclude table records
|
||
|
|
- `Include Views` : toggle this to include/exclude table views
|
||
|
|
|
||
|
|

|
||
|
|
|
||
|
|
### Table Delete
|
||
|
|
|
||
|
|
Right click on Table name on left sidebar, (OR)
|
||
|
|
Click on `...` to open `Table context menu`, select `Delete`
|
||
|
|
|
||
|
|

|
||
|
|
|
||
|
|
Click on `Delete Table` to confirm
|
||
|
|
|
||
|
|

|
||
|
|
|
||
|
|
## Column
|
||
|
|
|
||
|
|
### Column Add
|
||
|
|
|
||
|
|
Click on `+` button to the right of Columns header, type `Column name`
|
||
|
|
|
||
|
|

|
||
|
|
|
||
|
|
Select a `type` for the column from the dropdown. Depending on the column type, you might find additional options to configure.
|
||
|
|
Click on `Save column` to finish creating column.
|
||
|
|
|
||
|
|

|
||
|
|
|
||
|
|
#### Column create before OR after a specific column
|
||
|
|
You can also use context menu of an existing column to either insert before or after a specific column.
|
||
|
|

|
||
|
|
|
||
|
|
|
||
|
|
### Column Edit
|
||
|
|
|
||
|
|
Double click on Column name in column header to open `Column edit` modal
|
||
|
|
You can rename column & optionally change column-type.
|
||
|
|
|
||
|
|

|
||
|
|
|
||
|
|
Note:
|
||
|
|
- Changing column type might not be allowed in some scenarios & in some other, might lead to either loss or truncated data.
|
||
|
|
- Column name is also possible using Column context menu as described below
|
||
|
|
|
||
|
|
|
||
|
|
### Column Duplicate
|
||
|
|
|
||
|
|
Open `Column context menu` (click `v` on column header), select `Duplicate`
|
||
|
|
|
||
|
|

|
||
|
|
|
||
|
|
Note: Column duplicate only creates another column of same type & inserts it to the immediate right. Currently data in the column is not duplicated.
|
||
|
|
|
||
|
|
|
||
|
|
### Column Delete
|
||
|
|
|
||
|
|
Open `Column context menu` (click `v` on column header), select `Delete`
|
||
|
|
|
||
|
|

|
||
|
|
|
||
|
|
Click on `Delete Column` to confirm
|
||
|
|
|
||
|
|

|
||
|
|
|
||
|
|
## Row
|
||
|
|
|
||
|
|
For adding new values to the table we need new rows, new rows can be added in two methods.
|
||
|
|
|
||
|
|
### Row Add (Using Form)
|
||
|
|
Click on `New Record` at the bottom of the grid (footbar), select `New Record - Form`
|
||
|
|

|
||
|
|
|
||
|
|
Populate columns in the Expnaded form popup; click `Save`
|
||
|
|

|
||
|
|
|
||
|
|
### Row Add (Using Table Row at bottom of page)
|
||
|
|

|
||
|
|
|
||
|
|
Click on any of the following options to insert a new record on the grid directly.
|
||
|
|
- `+`
|
||
|
|
- `New Record` : `New Record- Grid`
|
||
|
|
- Right click on any cell, click `Insert new row` from the cell context menu
|
||
|
|
|
||
|
|
Note that, any record inserted in the grid will always be appended to the end of the table by default.
|
||
|
|
|
||
|
|
### Row Add (Pressing Enter Key from Previous Row)
|
||
|
|
|
||
|
|
When you finish editing a cell and press Enter, the cell in the next row with the same column will be highlighted.
|
||
|
|
|
||
|
|

|
||
|
|
|
||
|
|
### Row Edit
|
||
|
|
|
||
|
|
You can start editing by any of the following methods
|
||
|
|
- Double-click on cell to edit
|
||
|
|
- Click on cell and start typing (this way it will clear the previous content)
|
||
|
|
- Click on cell and press enter to start editing
|
||
|
|
- And it will automatically save on blur event or if inactive.
|
||
|
|
|
||
|
|
### Row Delete
|
||
|
|
|
||
|
|
Right-click on the row and then from the context menu select `Delete Row` option.
|
||
|
|

|
||
|
|
|
||
|
|
Bulk delete is also possible by selecting multiple rows by using the checkbox in first column and then `Delete Selected Rows` options from the right click context menu.
|
||
|
|

|
||
|
|
|
||
|
|
## Quick Import
|
||
|
|
|
||
|
|
You can use Quick Import when you have data from external sources such as Airtable, CSV file or Microsoft Excel to an existing project by either
|
||
|
|
|
||
|
|
- Hover on `Project title` in tree-view, click `...` > `Quick Import From` > `Airtable` or `CSV file` or `Microsoft Excel` or `JSON file`
|
||
|
|
- Drag and drop CSV, JSON or Excel file to import
|
||
|
|
|
||
|
|

|
||
|
|
|
||
|
|
### Import Airtable into an Existing Project
|
||
|
|
|
||
|
|
- See [here](/setup-and-usages/import-airtable-to-sql-database-within-a-minute-for-free)
|
||
|
|
|
||
|
|
### Import CSV data into an Existing Project
|
||
|
|
|
||
|
|
- Hover on `Project title` in tree-view, click `...` > `Quick Import From` > `CSV file`
|
||
|
|
- Drag & drop or select files (at most 5 files) to upload or specify CSV file URL, and Click Import
|
||
|
|
- **Auto-Select Field Types**: If it is checked, column types will be detected. Otherwise, it will default to `SingleLineText`.
|
||
|
|
- **Use First Row as Headers**: If it is checked, the first row will be treated as header row.
|
||
|
|
- **Import Data**: If it is checked, all data will be imported. Otherwise, only table will be created.
|
||
|
|

|
||
|
|
- You can revise the table name by double-clicking it, column name and column type. By default, the first column will be chosen as `Display Value` and cannot be deleted.
|
||
|
|

|
||
|
|
- Click `Import` to start importing process. The table will be created and the data will be imported.
|
||
|
|

|
||
|
|
|
||
|
|
### Import Excel data into an Existing Project
|
||
|
|
|
||
|
|
|
||
|
|
- Hover on `Project title` in tree-view, click `...` > `Quick Import From` > `Excel file`
|
||
|
|
- Drag & drop or select files (at most 5 files) to upload or specify CSV file URL, and Click Import
|
||
|
|
- **Auto-Select Field Types**: If it is checked, column types will be detected. Otherwise, it will default to `SingleLineText`.
|
||
|
|
- **Use First Row as Headers**: If it is checked, the first row will be treated as header row.
|
||
|
|
- **Import Data**: If it is checked, all data will be imported. Otherwise, only table will be created.
|
||
|
|

|
||
|
|
- You can revise the table name by double-clicking it, column name and column type. By default, the first column will be chosen as `Display Value` and cannot be deleted.
|
||
|
|

|
||
|
|
- Click `Import` to start importing process. The table will be created and the data will be imported.
|
||
|
|

|
||
|
|
|
||
|
|
## Export Data
|
||
|
|
|
||
|
|
You can export your data from a table as a CSV file by clicking the `...` menu in toolbar, and hover on `Download`. Currently only CSV and XLSX formats are supported for export.
|
||
|
|
|
||
|
|

|
||
|
|
|
||
|
|
## Import Data
|
||
|
|
|
||
|
|
You can export your data from a table as a CSV file by clicking the `...` menu in toolbar, and hover on `Upload`. Currently only CSV and XLSX formats are supported for import.
|
||
|
|
|
||
|
|

|
||
|
|
|